Access Database is Read Only

When I tried to open one of my main Access databases today, I got the alarming message, “The database ‘MyData’ is read-only. You won’t be able to save changes made to data or object definitions in this database.”

readonly01

I closed it, and tried to open it again, making sure that I hadn’t accidentally selected the Read Only option.

More Troubleshooting Steps

A Google search turned up some dire warnings that this could be a sign of corruption, so I created a new database, imported all the tables, queries, forms, and everything else, and all seemed well.

So, I renamed the old version, and gave the new version the same name as the previous one, so my Windows Explorer shortcuts and connections would work.

Is It Locked?

As soon as I opened the new copy of the database, the “read-only”problem was back. So, I decided to look for “.ldb” files.

When an Access database is open, it automatically creates an ldb file. This file has the same name as the database, with an “.ldb” or “.laccdb” extension. Later, when the database closes, that ldb file is automatically deleted.

  • NOTE: Access uses an ldb file to keep track of which records in the database are currently locked, and by whom. (Records are locked while someone is editing the record.) Maybe you’ve seen a “Write Conflict” warning message when you try to save a record, because someone else is changing that record, or a record close to it.
  • You can read more about these Access locking files on the Microsoft website.

Sometimes those ldb files don’t get deleted, when a database closes, and that can cause problems.

So, I looked for errant ldb files, that were mistakenly telling the database someone else had it open. There was nothing.

Connection Problem

Finally, it dawned on me — connections could be the problem.

I had an Excel file open, and it queried the database, so maybe that was the problem. I closed the Excel , re-opened the database, and it worked fine.

Later, if I tried to open the database when the Excel file was open, the database was read only.

Fix the Connection

Well, I don’t have the two files (Excel and Access) open simultaneously too often, but I wanted to have that option available.

So, I checked the connection strings for the queries and found that they included this setting:

  • Mode=Share Deny Write

I changed the setting to this instead:

  • Mode=Read

and the files now live in harmony (so far).

Where Are the Connection Strings?

To find the connection strings in Excel:

  1. Click the Data tab on the Ribbon, and then click Connections.
  2. On the Workbook Connections dialog box, click a connection name in the list
  3. Click the Properties button, to open the Connection Properties dialog box.
  4. Click the Definition tab, and edit the Connection String.
    • The strings that I edited were for Provider=Microsoft.ACE.OLEDB.12.0
    • The Mode setting might not appear in other types of connections.

Why Share This?

This information is probably of no interest to you, unless you landed here in a Google search for this error message:

  • “You won’t be able to save changes made to data or object definitions in this database”.

But, one day in the future, I might run into this error again, and maybe I’ll find my own solution when I do a Google search.

Don’t laugh — it’s happened to me before! (more than once!)

___________

Google Search Cheat Sheet

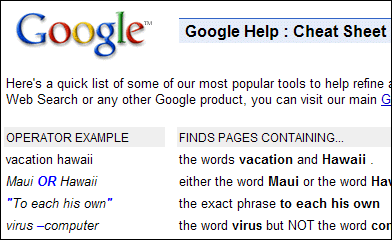
Did you know that there’s a Google search cheat sheet?

googlecheat01

Even though I spend several hours a week searching for things in Google (all of them business-related and highly intellectual), this was the first I’d heard about a cheat sheet. There are a few new (to me) tricks that should be helpful in future searches.

Special Operators

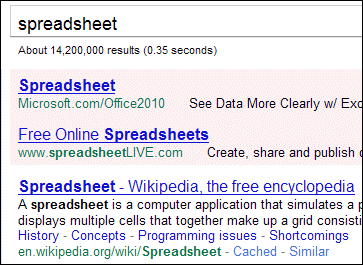
For example, you can use the ~ operator to find synonyms. If you search for "spreadsheet", a Wikipedia article on spreadsheets is at the top of the search results (after the sponsored links).

googlecheat02

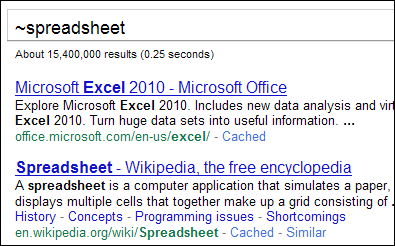
Add the ~ operator, and Excel is at the top of the list, with no sponsored links.

googlecheat03 

The Google Calculator

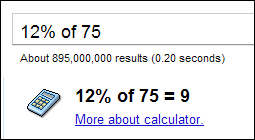
There’s a built-in Google calculator, and did you know that you can type % of as an operator? That’s handy, and news to me!

googlecheat04

What’s New to You?

Did you know all of the items on the Google Cheat Sheet, or are some of them new to you?

___________

Add Captions to a YouTube Video

I’m taking an online CSS course at SitePoint, and the instructions include some YouTube video tutorials. Yesterday’s video included captions, and so I did some poking around, to see how they were added.

To add the captions, you need a specially formatted file, with text, or text and time points. You can create this file yourself, or get some help from YouTube.

Request a Machine Transcript

For newer video, the transcripts are automatically created after you upload the video. You can skip this section, and go to the Download the Transcript section, below.

YouTubeCaptions08

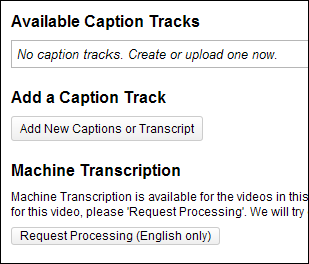
For older videos, you can request a machine transcript of the audio track.

  • Log in to YouTube, and view one of the videos that you’ve uploaded.
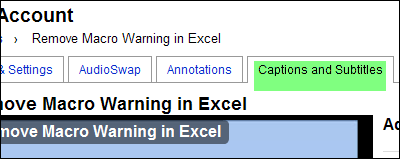
  • Above the video, click Captions and Subtitles, to see the options for adding captions or a transcript.

YouTubeCaptions00

  • Click the button for Request Processing (English only).
  • Then, wander off and do something else for a day or two, while the transcript is prepared.

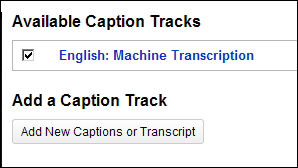
 YouTubeCaptions07

Download the Transcript File

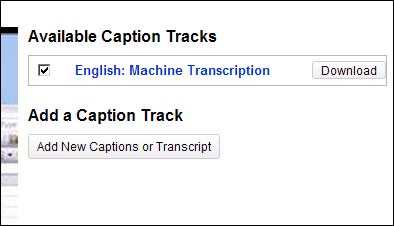
The message says it will take a few days to prepare the transcript, but I checked less than 24 hours later, and my transcript was ready.

  • Click the Download button, and save the file (in sbv format) to your computer.

YouTubeCaptions01

Revise the Transcript File

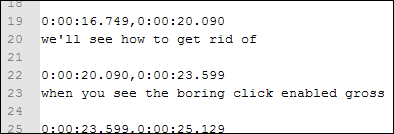
I opened the file in Notepad++, to see what it looked like. Some of the transcript looked fine, like line 20 shown below. Other text, like line 23, weren’t so good. Sure, some of the video might be a bit boring, but none of it is gross!

YouTubeCaptions02

So, I listened to the video, while making some corrections to the transcript. For example, line 23 was changed to, "When you see the warning, click Enable Macros."

Then I saved and closed the transcript file.

Upload the Transcript File

To upload the revised transcript file:

  • Log in to YouTube, go to the video page, and click the Captions and Subtitles tab.
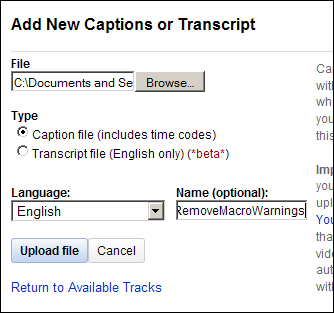
  • Click Browse, and select the transcript file.
  • Select a Type — either Caption File or Transcript File. The file that YouTube created for me had both times and text, so I selected Caption File.

For the Type option, YouTube describes the difference between a caption file and a transcript file:

  • A "caption file" contains both the text and information about when each line of text should be displayed.
  • A "transcript file" on the other hand just contains the text of what was said in the video. If the video’s in English, YouTube can use speech processing algorithms to determine when the words in a transcript should be displayed.
  • Add a file name (optional), then click Upload File

YouTubeCaptions03

See the Captions

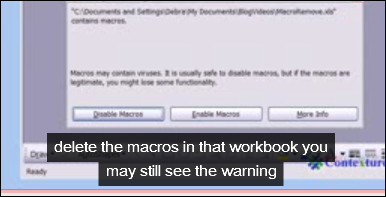
On the video, click the Play button, and the captions start rolling.

YouTubeCaptions05

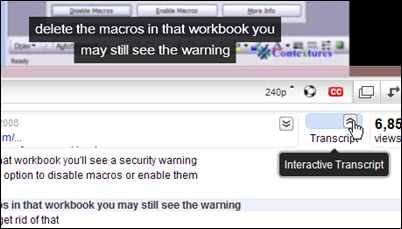
There’s a Transcript button that you can click, to see the entire transcript. It’s interactive, so you can click on a line, and go to that point in the video.

 YouTubeCaptions06 

Pros and Cons

There were many things to correct in the transcript file, but it was much easier to use that file, with the times added, than to create a transcript from scratch. Also, there was some entertainment value in seeing how my tutorial was translated.

The captions block the bottom 1/2" or so of the screen, and that might cover some of the tutorial material. However, for anyone with English as a second language, or a hearing impairment, the captions will probably be a useful addition to the video.

The Transcribed Video

Here’s the video, so you can see the results for yourself. If you can’t see the captions in this embedded video, you can go to the YouTube page.

What do you think of the captions? Is it something you’d add to your own videos?

______

Grading Your Website

website-grader-logo-smallIt’s the end of the school year — the perfect time to grade your website. Today I tried the free analysis tool, Website Grader, to see how well Contextures would do.

It’s easy to do — just fill in the website address and your email, then click the Generate Report button. There’s also an option to enter the website address for competitor sites, so you can compare your results with theirs. I picked a couple of other Excel sites, so I could see where Contextures stood in comparison.

A couple of minutes later, the results were shown, and Contextures scored 96.8 — pretty good, with room for improvement.

Website Content

Website Grader was impressed that I had a blog, and posted there recently. It told me how many Google index pages are on my site (156), and said, "Generally, the more pages your site has within the Google cache, the better." So, I’d better add a few more!

The readability score surprised me — College Undergraduate. I try to avoid five-dollar words, and describe things as simply as possible, but if you read my website, you’re obviously pretty smart.

There’s a link to a Blog Grader too, if you want to try that.

Website Optimization

The report warned me that my Page Title was too long — by 1 character, so I’ve fixed that. It also recommended that I get the font tags out of the page. I’m starting an online CSS course next week, so I’ll improve things after that.

Website Promotion

The report even gives you a Twitter Grade, if there’s an account tied to the website. I was surprised to get 91.36, since I only have a few followers, and don’t tweet very often.

Monthly Reports

I signed up for the free monthly report, so I’ll see if the minor changes that I made had any effect. They’re also promoting a paid service, but it starts at $250/month, so I’ll pass on that.

What’s Your Grade?

Have you graded your website? Did you agree with the outcome? Please share your results in the comments.

__________

You Have to Sleep Eventually

When you’re self-employed, you can set your own hours, and sometimes those hours can run into the wee hours of the morning. After staring at the computer screen all day and most of the night, your eyes might be tired, but the rest of you is strangely wide awake.

If you want to make it easier to fall asleep at night, adjusting the brightness of your computer monitor might help. I downloaded a free program, f.lux,  that changes the colour of your monitor, based on the time of day, and the type of lighting that you have.

flux01

Adjust the Settings

You can set your location by zip code or longitude and latitude, and it helps you find those settings, if you don’t have them memorized.

flux03

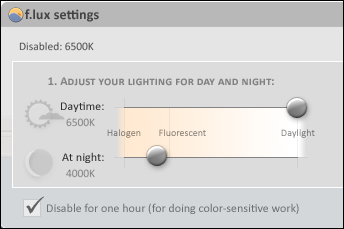
You can also adjust the daytime and night settings, to control the monitor colour changes.

flux02 

Turn It Off

There’s an option to disable the colour change for an hour, if you want to work on something colour-sensitive, or if you have to stay awake to finish the project that’s due tomorrow morning.

Be careful though — when I temporarily turned f.lux off, I was almost blinded by the monitor light.

Does f.lux Help?

Will the late night colour softening help me get to sleep? Maybe. At least it makes it easier to look at the screen in the evening, so that’s a good thing. And I am starting to feel a bit drowsy…. 

A Fresh New WordPress 3.0 Look

Emboldened by yesterday’s success in installing the WordPress 3.0 upgrade, I decided to install their new default theme — Twenty Ten. It’s optimized for all the new WordPress 3.0 features, so it will give me a chance to try some of them.

There’s a header picture option with the Twenty Ten theme, so this blog has a bit of colour now. Exciting, I know!

I’ve added a Recent Comments list in the right sidebar, and a list of categories, to make it easier to find things.

If you’re reading this in your RSS feed, you can wander over to the blog, and see what you think.

I like the clean look of the theme, and nice big font, and it’s easy to change the column settings and layout.

So far, so good.

___________

Testing the WordPress 3.0 Upgrade

An advantage to having multiple blogs is that you can test things on a smaller blog, before installing them on your main blog.

For example, WordPress 3.0 was released today, so I decided to test it on this blog first.

Backup First

Before installing the upgrade, I did an export of the blog’s data, from the WordPress dashboard. It would be smart to do a full database backup too, but I felt like living on the edge.

Find the Upgrade Button

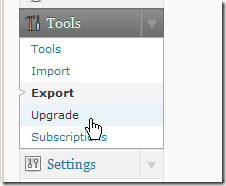
For previous upgrades, I’ve seen a notice near the top of the dashboard, advising me that a new version of WordPress is available. There wasn’t anything visible when I logged in to WordPress, and I found the Upgrade option under the Tools menu in the dashboard’s sidebar.

wp03a

Automatic Upgrade

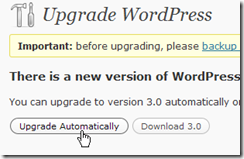
You can download all the files and manually install the upgrade, but I opted to click the Upgrade Automatically button.

wp03b

Everything went smoothly, and only took a few seconds.

New Features in WordPress 3.0

You can read about the new WordPress 3.0 features on the WordPress site.

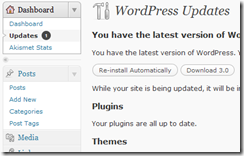
The new feature that I noticed immediately is the Updates option under the Dashboard menu in the sidebar.

It was highlighted with a 1 symbol, and showed that my Theme had an update available. It’s handy to have everything in one screen, instead of individual lists.

So, I updated the theme, and even remembered to re-install the Google Analytics tracking code in the footer!

wp03c 

Will You Upgrade?

I’ll wait a day or two before installing WordPress 3.0 on any other blog, just to be sure everything REALLY went smoothly.

How about you? Will you upgrade to WordPress 3.0, or stick with your current version for a while?

___________

Problems Deleting an Outlook Folder

I’ve had some strange problems with Outlook for the past couple of weeks

  • complains about things not being closed properly
  • usually crashes the first time I try to print a message
  • crashed when I tried to select a couple of messages (it’s challenging to delete a message when you can’t click on it!)
  • very slow opening and closing

Probably the Outlook file was getting pretty big, so I deleted a bunch of messages, and compacted the Personal Folder. The Outlook.pst file was reduced to about half its previous size, but some of the problems persist.

How To Delete an Outlook Subfolder

Today I wanted to delete a subfolder that I don’t need, and even though the folder is empty, an Outlook showed a message said the folder was full, and couldn’t be deleted. Or maybe I didn’t have the correct permissions, and should check with the Administrator. Well, I’m the Administrator, and have permission to do whatever I want!

Google showed me how to get rid of that folder though.

  • Press the Ctrl key while opening Outlook, and confirm that you want to open in Safe mode.
  • Then, while you’re in Safe mode, select the folder and delete it.

If you’ve run into a similar problem, I hope this works for you too.

__________