Learn JavaScript Programming in a Year

Sure, you can program in Excel VBA, but what other programming languages do you know? Maybe VBA is enough, but if you’d like to expand a bit, there is a free course in JavaScript programming that I’m trying out.

The course is online and interactive, and they’ll send you an email each week, announcing the new lesson. You don’t have to register on the website, unless you want to track your progress as you go along.

Easy Steps

To get started, I did the mini-course, “Getting Started with Programming”.

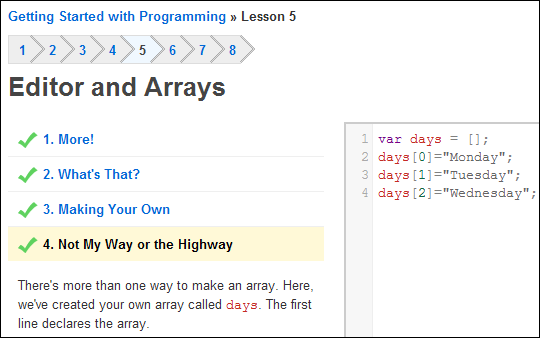
So far, I like the lesson setup and interaction. You read a short instruction step, type something in the interactive box, and get immediate feedback. In the screenshot below, I’m in lesson 5 of the total 8 lessons.

I lost track of the time, but best guess is that it took about an hour to go through all the lessons. In the CodeYear course, you’ve got a week before the next lesson arrives, so you could spread it out over a few days. Maybe those lessons will be tougher than the lessons in this intro course.
codeyear03

You’re Not in Excel VBA Anymore

The course is just starting, but I’ve already learned a few key differences between JavaScript programming and Excel VBA programming.

  1. Variables are case sensitive. In Excel VBA, after you define a variable, you can type it in the code, and the case automatically corrects. I use that as a tool for catching misspellings. In JavaScript, that doesn’t happen.
  2. End with a semi-colon. At the end of each line of JavaScript code, you have to remember to type a semi-colon. Unless, of course, the semi-colon is on the next line, with a curly bracket. This might take me a while to remember!
  3. Arrays are enclosed in square brackets. In Excel, we use curly brackets instead.
  4. Three equal signs for “equal to”. In Excel VBA, it only requires one = to check if one value is equal to another.

This should be interesting! If you sign up too, you can let me know in the comments, and we can compare notes.

______________

Recovering Deleted Pictures From Digital Camera

One of my hobbies is photography, and I post the results on the family blog, and a few on the Contextures blog. Unlike the old days of film, when you thought about the cost of each print, now you can take hundreds of pictures, and not worry.

Usually, things go smoothly, and I upload the pictures from my Nikon D3100 digital camera (Amazon link) to the computer, with no problems. The camera takes photos and videos, and I clear it off after each upload, to make room for the next photo session. Those videos can take up a lot of disk space!

Missing Pictures

Something went wrong yesterday though. I pressed Ctrl +A to select all the pictures on the camera’s media card, and copied them to the computer. Then, I put a backup copy on my laptop, as usual, just to be safe. I always take a quick look at the thumbnails too, just to be sure that the pictures were copied. After that, I cleared the pictures from the camera, and put it away.

A short time later, I took a closer look at the pictures on my laptop, and realized that several were missing. I had taken my last picture around 4 PM, and the latest picture on the computer was from 2:30 PM.

I checked the desktop computer, and they weren’t there either. Nope, not on the camera either. Those pictures had vanished into thin air, or the Ethernet, or somewhere.

Picture Recovery Software

Google can be your friend, at times like these, so I started searching for picture recovery software. There were lots of suggestions, but all of the programs were free to preview your missing pictures, and pay $25-$50 for the full program, if you wanted to download the pictures.

I don’t mind paying for programs, but vaguely remembered using a free program, a few years ago, that worked great. Finally, I found the free picture recovery software that I was looking for – Recuva, by Piriform. They make CCleaner too, which I should run again soon.

Pictures Recovered

I downloaded the free version of Recuva software, scanned it for viruses (all clean!), and installed it. The program is simple to use, and quickly recovered all my pictures, and even the 3 videos that were missing.

I took the media card out of the camera, popped it into the laptop, and Recuva showed me all the pictures that had been deleted recently. I added check marks on the ones that I wanted, and copied them to the laptop. The recovered pictures were the same quality as the other pictures, so that was a relief.

The program is now on my computer, and I hope that it’s never needed again! But without Recuva, I wouldn’t have this amusing picture from our afternoon game of hide and seek. Can you find my granddaughter?

recover deleted pictures

___________

Note: This article contains an Amazon affiliate link.

Disappearing YouTube Comments

YouTube sends me an email if anyone comments on one of my videos, or on my Contextures channel page.

Most of the time, it’s easy to log in to YouTube and approve the comments. For the past few months though, I’ve had problems with the comments on my profile page. I follow the link in the notification email, and there’s no comment to approve.

It’s frustrating, and I’ve tried digging into every corner of YouTube, with no success.

Finally, after receiving another comment today, I found the solution. Buried in one of the YouTube help forums, there was a suggestion to add a new comment on your own profile, then delete it, and refresh the page.

It seemed clumsy, but I tried the tip, and it worked! All the mysterious hidden comments appeared, and I approved them.

If yours was one of the comments, thanks for posting it, and sorry it took so long to approve.
_________________

Online Meetings on the iPad

The iPad that I got last month is certainly enjoyable, but so far I haven’t found anything that even comes close to Excel. Maybe Numbers is better on the Mac, but it’s not winning me over on the iPad.

This week, though, I found a new use for the iPad – watching webinars with the free GoToMeeting for the iPad. With the iPad sitting between the two computer monitors, I can listen to the webinar, and glance at it occasionally. It’s perfect for those sessions that don’t require your full attention.

DSC_0011

GoToMeeting App Advantages

It’s great — none of the valuable monitor real estate is used, and you can even zoom in on the iPad presentation to see something.

For the meeting that I attended, the audio was fine, without plugging in the earphones. Attendees were in “listen only” mode, but it looks like you can use the iPad microphone if the meeting organizer allows it.

GoToMeeting App Limitations

On the down side, none of the extra features for GoToMeeting are available, like chat, or screen sharing, or voting. And you can’t set up a meeting from the iPad app – you can only attend scheduled meetings.

So, this app will be perfect if you want to attend a webinar, and aren’t interested in posting questions, or other interactions during the meeting. Not recommended for client meetings, unless it’s an emergency!

_______________

Posting From an iPad

Last week I bought an iPad 2 and have been busy experimenting with it. There are plenty of games, and social apps, which are very entertaining. Now I am trying to find some practical uses for the iPad, so it’s not just a toy.

Today I found a WordPress app that lets me write posts for the blog, so this is my test post. It’s hard to type on the on-screen keyboard, so please ignore any typing errors.

I also bought Numbers for iPadicon, and will let you know what I think of it, after using it for a while. It’s very different from Excel, so it will take some time to figure out.

If you have an iPad, and know of any useful apps, please let me know in the comments.

_______________

Format VBA Code Examples in Blog Post

On the Contextures blog, Gregory suggested using the WordPress plugin, CodeColorer, for formatting the Excel VBA code examples.

In Twitter, Dick Kusleika said that he’s using CodeColorer too, and it works well. I decided to test the plug-in here, before installing it on the Contextures blog.

The CodeColorer feature list looks promising, especially these items:

  • syntax highlighting of code in comments
  • code protect from mangling by WordPress (for example, quotes, double-dashes, etc would look just right as you entered)

Installing the CodeColorer Plugin

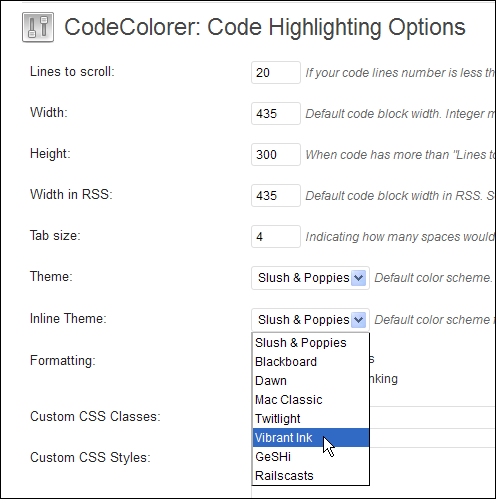
The installation was quick and easy, using the WordPress dashboard. After activating the plugin, I went to the its settings page, to see what could be adjusted. What’s the fun in having a new toy, if you don’t try to break it?

CodeColorer01

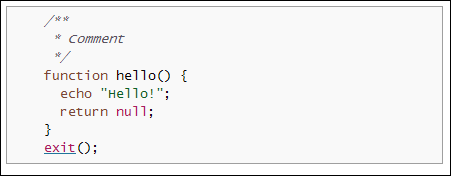
There is a preview of the code, at the bottom of the settings panel. I changed the Theme, from the default of Slush and Poppies(!) to Vibrant Ink. The preview only changed after I clicked the Save Options button.

Yikes! That’s not the look I’m going for.

CodeColorer02

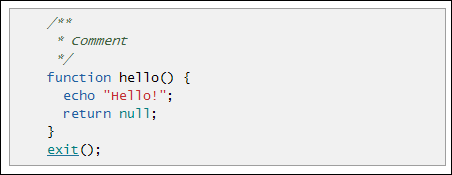
Twitlight (yes, TwiTlight), looked about the same. At the other end of the code formatting scale, Dawn is a bit too subtle.

CodeColorer03

So, back to Slush and Poppies it is. Is it just me, or would Slush and Puppies be a better name?

CodeColorer04

The Formatted Code

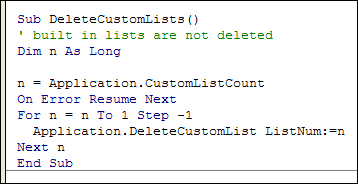
Here’s the snippet of code that I copied from Excel VBA.

Sub DeleteCustomLists()
' built in lists are not deleted
Dim n As Long

n = Application.CustomListCount
On Error Resume Next
For n = n To 1 Step -1
Application.DeleteCustomList ListNum:=n
Next n
End Sub

And this is how it looked in Excel

CodeColorer05

Formatted Code in Comments

The CodeColorer plugin is supposed to format the code in the comments too. You can test it here, and please let me know if you have any trouble, or suggestions.

To format your code in the comments, use this syntax:

CodeColorer06

Thanks!

______________

Organizing Email in Outlook

A couple of weeks ago, due to some computer problems, I set up a new copy of Outlook 2010 on my laptop.

I’ve used Outlook for many years, starting with Outlook 98, I think. Usually I copy the old Outlook files to a new machine, or upgrade over an existing version, but this time I was starting fresh.

In the past, I’ve had one or more folders for each client, plus dozens of other folders for website related emails, personal correspondence, newsgroup follow-up, and anything else I could think of.

The Simple System

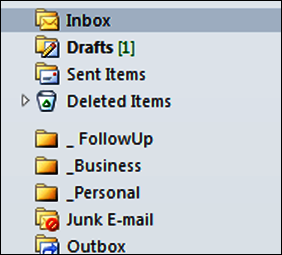
This time, I’m keeping it simple. In addition to the built in folders that Outlook has, I’ve only created 3 folders for my mail:

  1. _ Followup
  2. _Business
  3. _Personal

OutlookFolders01

The underscores keep my folders above the other Outlook folders, so they’re easy to find. So far, it’s working well. I don’t have to think about filing, or wonder which subfolder I stored an email in. To find something in the Business folder, I can sort by name, or date, or use the filter or search tools.

Your Outlook System

How about you? Is your Outlook folder system simple, or complex?

_______

Excel Video Tutorials With Camtasia Studio

A few years ago, the nice people at TechSmith gave me a licence for Camtasia Studio, and I use it to make my Excel video tutorials.

I’m currently using Camtasia Studio 7, and use a few of its great features, like cursor highlighting. That surrounds the pointer with a bright yellow circle, so it’s easier for viewers to follow what I’m doing.

Of course, there are many features that I haven’t explored, so when today’s Camtasia Studio newsletter arrived, I followed a couple of the links to their online tutorials.

To test my new skills, I updated a short pivot chart video that I posted recently, by adding a title clip, transition,  zooms, and a couple of callouts.

Below, you can compare the original video with the updated version. What do you think? Do any of the added features help? Please let me know in the comments, or in the features poll at the end of this blog post.

The Original Excel Tutorial Video

Here is the original pivot chart video, hosted on YouTube:

The Revised Excel Tutorial Video

Here is the revised pivot chart video, hosted on Screencast.

Vote in the Video Features Poll

In the poll below, please pick the features that help make the video better.

[polldaddy poll=4876611]

_________