
Since 2011, I’ve sold my Excel products through E-junkie and it has worked well for me so far. As a seller, you automatically get an online store on the e-junkie site, and you should take advantage of that opportunity. Here’s how I add products to my E-junkie store.
View the Shop
If you don’t have an E-junkie seller’s account yet, go to their sign-up page, and get a 7-day free trial. I use the E-junkie Standard plan. Then upload a product or two, and you’re ready to set up your shop.
Before you get started with setting up your products in the shop, you can take a quick look at what’s there by default.
- Log in to e-junkie and go to the Seller Admin page
- At the top of the page, click the Shop button
That will show the entire e-junkie marketplace, with the latest products listed first.
- To see your shop, click the View Your Shop button

That will display all your products, and the categories that you’re created.
At the top of your Shop page, click the Manage Your Shop button, to go back to the Seller Admin page.
Show Your Products
It probably won’t bring much traffic, but you should add all your products to your e-junkie, with a brief description, so people can find them. Also, when you upload new products, remember to add them to your store too. I just added a new product, so that’s what prompted me to describe the steps – I’ll be able to use these notes the next time! 😉
For example, my store’s name is Contextures, and here is the link, and a screen shot of a couple of the products in the store.

Customize Your Store
By default, the store’s address is the e-junkie site, plus your account number. You can customize that, and give it a custom name
- Log in to e-junkie and go to the Seller Admin page
- In the Manage Seller Account section, click Edit Preferences
- In the Customize Your E-junkie Shop URL section, add your custom name
Then, stay in the Edit Preferences, while you read the next section, below.

Add Your Logo
The store shows your Custom Logo, so make sure that you have uploaded one in your e-junkie account.
- On the Seller Admin page, in the Manage Seller Account section, click Edit Preferences.
- In the Upload a Custom Logo section, click the “Upload Your Logo” button
- Follow the instructions, and upload your logo, then close that page.
- Go back to the Seller Admin page
When I uploaded my logo, the following specifications were listed:
- GIF, JPG or PNG file.
- File size not more than 100 KB.
- Width 736 pixels or less
- Height 90 pixels or less.
Add a Product to the Store
It’s easy to overlook the Store feature, so here’s how to add a product.
NOTE: Your products will be listed in the reverse order that you add them. So, if you’re adding several products at once, start with the ones that you want at the end of the list.
- Log in to e-junkie and go to the Seller Admin page
- Click the View/Edit/Delete Products link
- At the top of the page, select the product that you want to add to the store
- In the “E-junkie Shop & Marketplace Listings” section, click the Add/Edit Product Page button.

Enter Product Details
On the Product page, fill in a description, in the box at the top.

Then, select a main category for the product, and you can also enter subcategories. I usually ignore the subcategories.

Be sure to enter the URL of the main sales page for that product on your website.

Add More Information
You can upload an image for your product, so find something eye-catching, if possible, and upload it. You can upload both a thumbnail size image, and a bigger image. I just uploaded a bigger image, and it automatically used that for the product thumbnail.

Add a tagline for the product too, and a short description.

Check the Results
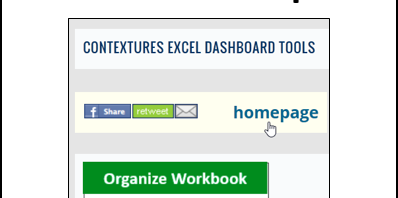
When you’ve filled in all the details, click the Apply button. Then, use your store’ URL to view the results. Here is the product that I just added.

You can click the image, or the product title, to go to the product page. You’ll see your long description on that page, plus the image that you uploaded, and a link to the sales page (Home Page).

Make Changes
If you don’t like the results, or if you want to make any tweaks, you can go back to the product page, and edit it.
One minor complaint — I don’t see any way to change the Store page. The products are listed in the reverse order that you create their descriptions. So, if you’re adding several at once, start with the ones that you want at the bottom of the list, and end with the one that you want at the top.
___________________________
